

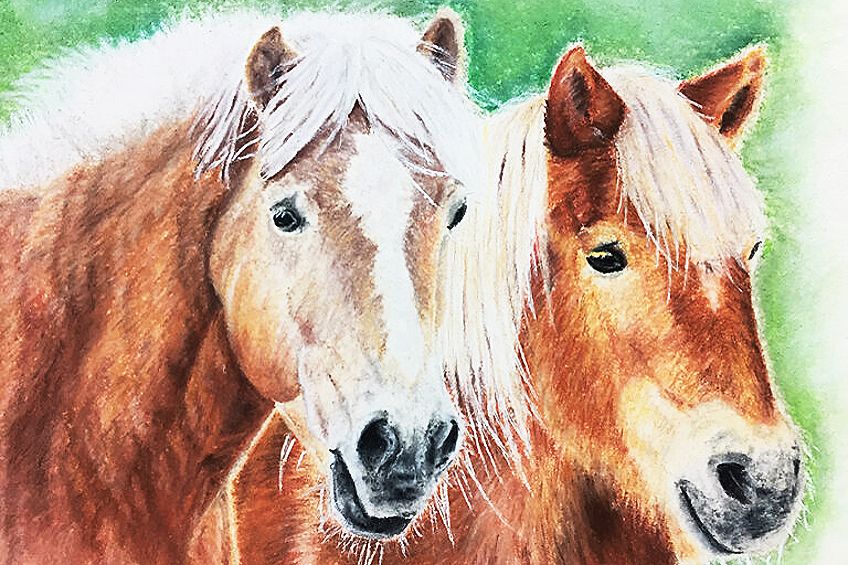
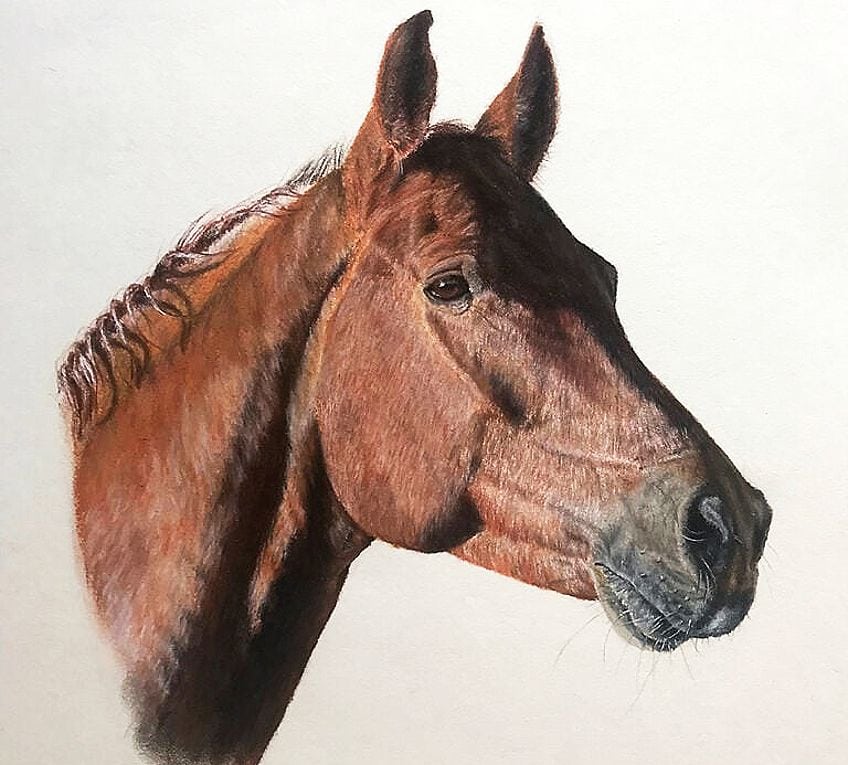
Realistic Sketch Horse Head Drawing
Drawing horse heads can be tricky, which is why we have created this awesome step-by-step how to draw a horse head tutorial. You will learn all the basics when it comes to horse drawing in pastels. We also include a bunch of helpful, handy tips and a list of the best materials to use! In our example drawing of a horse, we show you how to draw the head of a horse. Everyone can benefit from our easy guide, so have fun and let us get started!
Table of Content
- 1 What You Will Need to Get Started
- 2 The Right Approach
- 2.1 Selecting the Perfect Template
- 2.2 Color and Surface Focus
- 2.3 The Perfect Workspace
- 3 How to Draw a Horse Head Step by Step
- 3.1 Step 1 – The Horses Ear Veil
- 3.2 Step 2 – Priming the Horse
- 3.3 Step 3 – Transitional Blending and Surface Softening
- 3.4 Step 4 – Adding Shading and Setting Accents
- 3.5 Step 5 – The Horses Bridle
- 3.6 Step 6 – The Horse's Neck and Cheeks
- 3.7 Steps 7 & 8 – Additional Neck Work and Reflection Setting
- 4 Are all Horse Heads Drawn the Same Way?
- 5 Frequently Asked Questions
- 5.1 Horses Seem Difficult to Draw, Can Anyone Complete this Tutorial?
- 5.2 Can You Follow this Tutorial With Something Other than Pastels?
What You Will Need to Get Started
When it comes to pastel drawing, you don't need a whole lot of materials. But, you do need the right ones for the job! While a regular piece of paper and some pastels will do the trick, it's always nice to have the extras. It does help to have good quality art supplies as they will make horse drawing easy! Here are some of our must-haves!
- Canson Mi-Teintes Pastel Paper Pad – For your horse sketch and pastel work.
- KOH-I-NOOR Mondeluz Portrait Aquarell Coloured Pencils – Helpful for priming of larger areas
- 48 pack of KOH-I-NOOR TOISON D'OR 8516 Artist's Soft Pastels – These help you with layers and the horse's coat structure
- Faber-Castell Pitt Artist Brush Pen – This will help with tactile hair drawing as well as reflections.
- LEOBRO 11 Pieces Artist Blending Stump – To enable you to blend, soften and create proper coat structure.
- Winsor & Newton Kneading Rubber – Helpful as you can shape it to erase just the right parts.
- Arteza Eraser Pencil – This eraser is harder, helping with smaller repair, or to lighten smaller areas.
Using a white gel pencil is best when it comes to smaller details like tactile hairs or smaller reflections. These are both very important when drawing horses. They help to make your image more alive and help make your final result much more interesting.
The Right Approach
When you learn how to draw horses, remember that there are a few factors involved before you begin. Make sure you have the following in order before you get started.
Selecting the Perfect Template
Before you can start your drawing of a horse you will need the perfect horse template. Try to keep simple and do not get too ahead of yourself. Especially because you are still learning how to draw horses! You need to determine where the horse is looking, or its gaze as well as the horse's coat and even the eye reflections. If you are able to see these things, your template should be good to use and work from.
Never use a blurry image and ensure they are crisp and clear or you will have much frustration trying to figure things out and soon lose your motivation. Always find an image that is complete so you do not end up needing to improvise for what the image is lacking. Remember, the sharper and detailed images are going to be the easiest for you to be able to draw.
Color and Surface Focus
You will need to consider surfaces when doing a horse drawing. In other words, when you look at a horse, you do not see the animal's eyes, but instead the shape of them and their border which is filled with brown shades. You notice lighter brown or some white dotting within the tones of brown.
The Perfect Workspace
You need a space where you feel happy if you want to draw. Often, your artwork will take hours upon hours to finish. A3 sizes can take up to 30 hours to complete! Make sure you are comfortable, put some music on, or turn on the TV to keep you company while you work.
How to Draw a Horse Head Step by Step
We have got all the basics covered! Now all that is left is our simple-to-follow guide on drawing a horse. Be sure to look at our step-by-step images, too. Begin by drawing the outlines first as a rough sketch. Using your pencil you can also demarcate where you will fill each gradient and use color strokes.
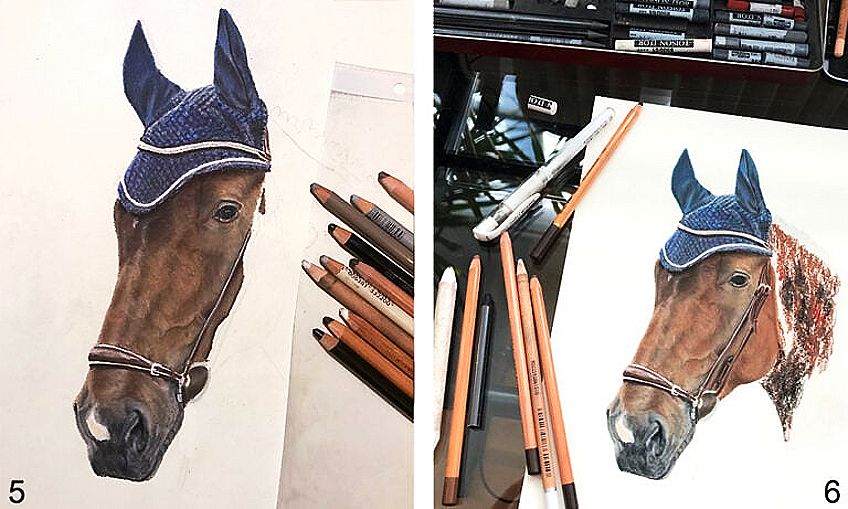
Step 1 – The Horses Ear Veil
A good idea is to start working from the top of the page to the button. This will help you to save your drawing of a horse from smudges. In our example image, the horse is wearing an ear veil. Ours was done in a medium blue color. Firstly, you need to prime your surface and work it in with your fingers. The fabric of the ear veil was completed using lighter blue tones as well as white and black.
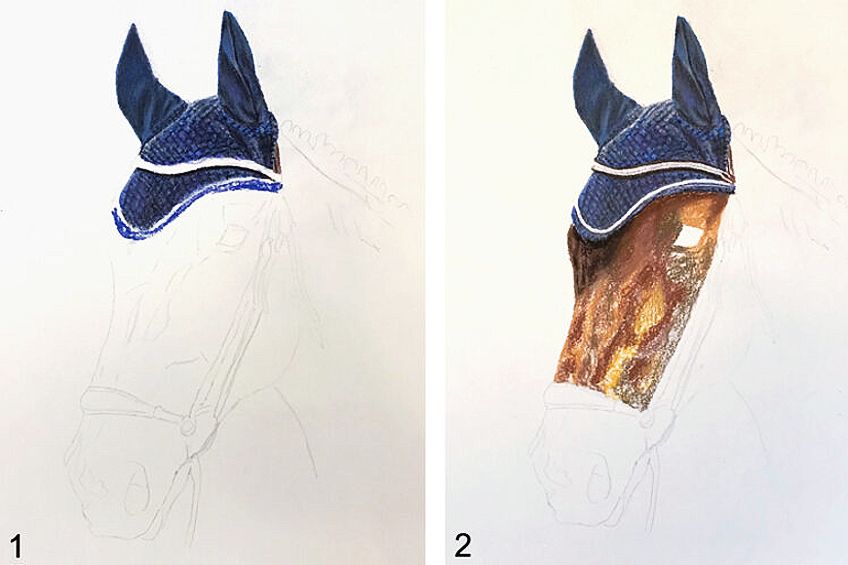
Step 2 – Priming the Horse
When you have completed the upper area of your horse (the ears) and the brown band which lies over the ear bonnet, you will need to roughly prime the first coat. Use different brown shades varying from very light to very dark. Do not fret if your colors are slightly different from your template image. Once complete with all the lightning and darkening it will likely be a very close match.
Step 3 – Transitional Blending and Surface Softening
Your surface is primed, now using a grey pastel you can soften up your surface and begin the transition blending. This will ensure a more uniform look. Don't forget the coat's hair direction and do this with faster, shorter strokes of the hand.
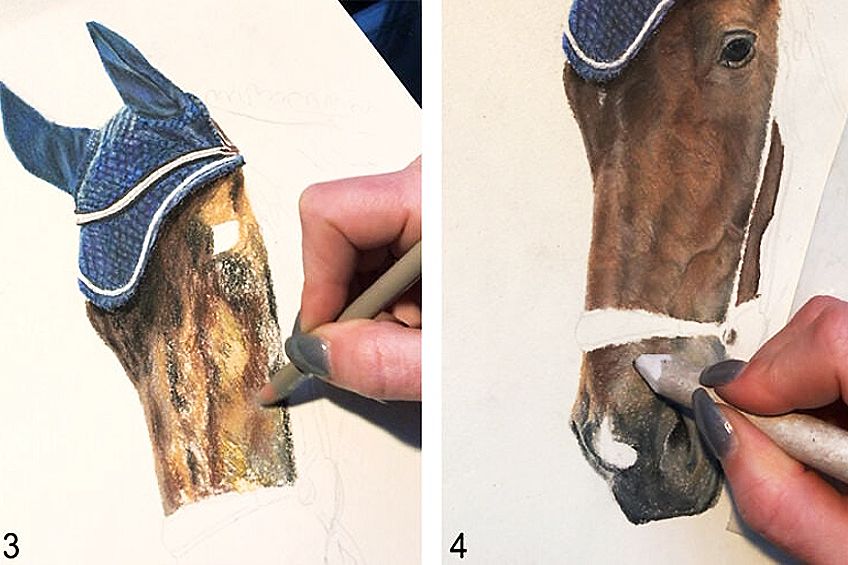
Step 4 – Adding Shading and Setting Accents
Once you are done blending everything in, you can set your accents on the lighter and darker areas in your horse image. You will be able to see that your color use is starting to look a lot more like the originals. Your image will nicely match the template image.
You may notice a few little gaps showing the white paper beneath, just use your finger to work the color in a bit and blend. Use a blending stump if the area is too small.
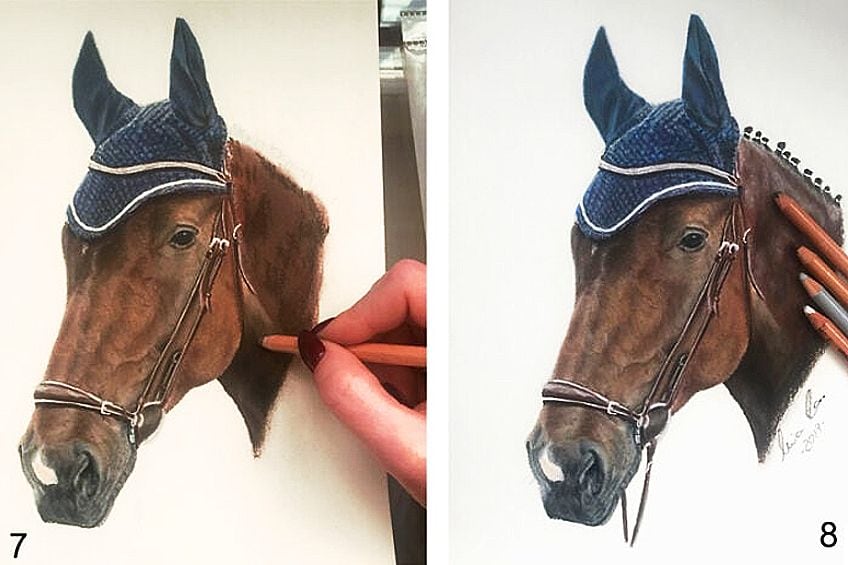
Step 5 – The Horses Bridle
The bridle is an important part. When you draw a bridle, you can easily do it in a two-dimensional manner. You will not have to hatch each hair one by one, just prime the area in a medium brown. You can then add light and dark tones to give it accents. Bridles have stitching, in this drawing they are white. You can use a white marker for the smallest seams but otherwise use a softer white pastel piece.
Step 6 – The Horse's Neck and Cheeks
The horse's neck and cheek area are easier as you no longer need to worry about little individual hairs like you did when drawing the face. Using short front strokes we colored the front area of the horse's head, in order to show each hair individually. What is left, however, is a coarser part of the coat, and then the image blurs. Start by precoating it all in a medium brown, try to set it all in the same direction the coat grows. When adding a veneer, you will be able to see this.
All shades should be done in direction of coat growth. For these rougher surfaces, you should use pencils as well.
Steps 7 & 8 – Additional Neck Work and Reflection Setting
It is now time to grab your white pastel and add shine and reflection to your horse drawing. Work them in with your fingertips, keeping coat direction in mind at all times. Do not use a blending stump as this will remove far too much pastel turning your shiny horse coat into something with lines and bumps.
Remember, practice makes perfect and you can never practice enough! Pay attention even to the tiniest details as these little details will help correct the horse's expression. Your eyes should dart between your template and your artwork while you draw.
One of the best things about pastels is how forgiving they are, so even if you do make a mistake you can remove it with your rubber. Or even just draw over it. Remember, you can not erase dark pastel.
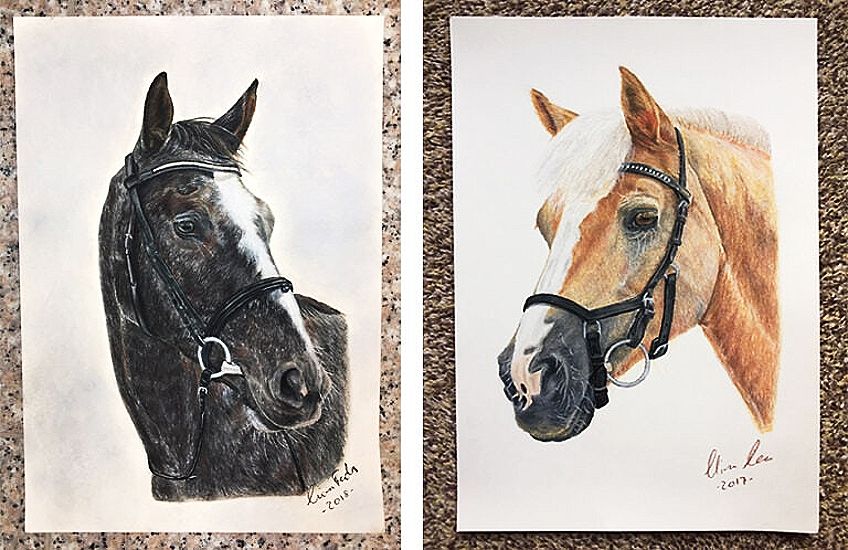
Are all Horse Heads Drawn the Same Way?
Well, of course, they are not! There are so many different horse breeds and they all come in many many colors as well! Just like dogs or cats, there are many different kinds to choose from. You even get longer coated horses – another skill you can develop as you learn and practice. The horse's size also varies, as do the horse's mane and tail length and so forth.
To answer this in one sentence: No, of course not. There are many different horse breeds. What is different from drawing dogs is that the coat length remains almost always relatively the same. Remember that during winter, even shorter coated horses often grow a thicker coat, so, should you wish to draw a horse with such a coat. It means you will have to adjust your hair length while drawing horses like this.
To make horse drawing easy and until you feel more confident, it is better to find those with short summer coats. It is also simpler to draw only the horse's head or the body while the animal is standing still when starting out, as once you begin to draw the body in motion it can become more complicated.
When a horse moves, muscles change, as do the tail, the mane, and many other factors. You will have to use a lot more lighting and shading when drawing a horse that is in motion or it will not look realistic. And while the standing horse still has muscle definition, it is far more complex when moving!
We hope you have many happy hours drawing and using pastels, they are so much fun! Try some other horse sketches and keep practicing! Remember, everything takes time and patience but pretty soon, you will learn to develop your own special techniques which will help you on your artistic journey!
Frequently Asked Questions
Horses Seem Difficult to Draw, Can Anyone Complete this Tutorial?
Absolutely! This tutorial is suitable for artists of all levels. Horses may seem intimidating for new artists, but our tutorial breaks the process down into easy steps that anyone can follow.
Can You Follow this Tutorial With Something Other than Pastels?
Of course. This tutorial is designed for oil pastels, but if you are an accomplished pencil artist or you prefer to work on a graphic tablet, you can definitely adapt the process and achieve stunning results.

Alina Fuchs
Living in Dortmund, Alina Fuchs has worked in the Mettmann district since 2017. In 2010 she finished high school and went on to study social work. In 2014 she completed her bachelor's degree and then continued to study, this time in the public administration sector. Alina has loved art and animals for her whole life and as a child, would always choose nature or drawing over watching television shows like her peers.
Alina's aunt, Silke, was a huge inspiration for her as she loved to draw horses. Alina would then trace or color the pictures in. She was the kind of child who would bring home every animal if she could! She also grew up around horses and canines and thanks to that early exposure to them, she is now able to draw them beautifully.
Alina's father fully supported her passion and realized she needed better art supplies, giving her a pastel chalk box as a Christmas gift back in 2011. This gift was the true key and she has ever since been in love with art. While Alina never attended any formal art classes, her work speaks for itself!
"Go ahead and dare to form your own style!"
Alina Fuchs
Alina (@fux.kunst) • Instagram photos and videos
Realistic Sketch Horse Head Drawing
Source: https://artincontext.org/how-to-draw-a-horse-head/
Posted by: vanalstynerefustoo.blogspot.com
0 Response to "Realistic Sketch Horse Head Drawing"
Post a Comment